RoboCom Documentation - Contents
0. About this Document
0.1. Credits
0.2. History
1. Introduction
1.1. From CoreWar to
RoboCom
1.2. Development
2. The concept of the
game
2.1. The board -- a boundless
background
2.2. Robot design
2.2.1. The reference
field and the robot direction
2.2.2. Instruction
set
2.2.3. Robot properties
2.2.4. Code banks
2.3. The RoboCom programming
language
2.3.1. Parameters
2.3.2. Constants
2.3.3. Variables
2.3.4. Remotes
2.3.5. Basic structure
of a RoboCom program
2.3.6. Instructions
and their meanings
2.3.7. Comments
2.3.8. Labels
2.4. Auto-reboot
2.5. Exceptions
and errors
2.5.1. Tolerable
exceptions
2.5.2. Run-time errors
(fatal exceptions)
2.5.3. Data hunger
2.5.4. Elimination
3. Let's get started!
3.1. Invoking RoboCom
3.1.1. RoboCom version
1.x
3.1.2. The shell system
3.1.3. Windows version
3.2. A simple program
3.3. The initial robot
and the production of further robots
3.4. Program variety
or single pattern?
3.5. Errors which are
actually not errors
3.6. Time for an inspection
-- the RoboCom debugger
4. Literature and
links
0. About this Document
The newest version of this document, the RoboCom
interpreter and all RoboCom programs mentioned are always aviable at the
RoboCom Homepage:
http://www.cyty.com/robocom/
(C) Copyright by Dennis C. Bemmann.
All rights reserved.
0.1. Credits
The RoboCom documentation was written in German
language by the author of RoboCom - The Programmers' game: Dennis
C. Bemmann.
English translation by IOPL with the help
of Babelfish (http://babelfish.altavista.digital.com/)
English HTML version by Jens Rupp
Revised by Dennis C. Bemmann
0.2. History
| 1998-06-21 |
translation to english |
| 1998-06-22 |
re-conversion to HTML |
| 1998-06-28 |
correction and revision |
| 1998-06-28 |
German 'properties' diagram translated into English text |
| 1998-07-14 |
Added paragraphs about RBIs |
| 1998-09-09 |
Re-revision |
1. Introduction
I
have designed a computer game in
which the players do not have control over the progress of the game once
it is started: each user writes an assembly-like program which has to decide
its part in the game independently.
For the game environment I used a square
board that resembles a chess board. The pieces (robots) are represented
by oriented pentagons. The objective is to put the opponents' robots out
of action while remaining functional. There are no weapons: the only way
to manipulate other robots is to transfer code to them. After the development
of the interpreter, I had to write my own programs for the robots. It later
became clear that there are amazingly many different strategies for winning
which are all successful, each in its own way.
1.1. From CoreWar to
RoboCom
The introduction possibly reminds you of the
game CoreWar - in fact this game has inspired me considerably.
CoreWar is a very old computer game created
by programmers in their spare time, in order to gauge their programming
abilities. Programs were also written before the game started, after which
they ran in the (one-dimensional) memory of a virtual computer. Programs
were written in an assembly dialect known as RedCode. One fascinating
aspect of the game is that it encourages the use of practices that a good
programmer would normally not use: most good CoreWar programs make use
of self-modifying code or otherwise write haphazardly to memory. However,
this also results in programs becoming incomprehensible to third parties
very quickly, and therefore CoreWar is mostly suited for experienced assembly
programmers. This fact disturbed me greatly as beginners could not write
such programs easily.
Therefore I decided to create a game which
contains some ideas from CoreWar, but which is less abstract and simpler:
so simple that it can be understood by BASIC and Pascal programmers at
the first glance. In RoboCom each robot has its own memory. The board is
a 2-dimensional board on which the robots move. The language resembles
assembly and is limited to a few instructions.
1.2. Development
I decided to write the RoboCom interpreter
program using Turbo Pascal 6.0, which offers the possibility of object-oriented
programming. I programmed the mouse-based user interface of the interpreter
on a BGI base using the VgaHi mode.
Starting from April 1998, there is even
a Windows version of RoboCom. The game was completly rewritten in Delphi
and optimized for speed and memory consumption. I developed the user interface
of the Windows version together with Jens Rupp from Erlangen.
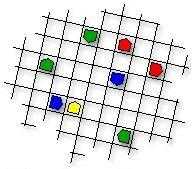
2. The concept of the
game
2.1. The board -- a boundless
ground
We begin with the `board' -- the ground on
which everything takes place. It consists of n * n identical fields arranged
as in a chessboard. n can be selected freely - in most of the cases, values
between 10 and 30 are used.
The board is relative: there are no absolute
coordinates for any field. A robot at the edge of the field leaves and
emerges on the opposite side. Therefore there is no way for the robot to
find out where it is -- such a specification would be meaningless since
all fields are identical. It can however find out how large the playing
field is in order to e.g. control its movements in such a way that it visits
all fields possible.
2.2. Robot design
At the beginning all robots are placed randomly
on the board. Now I had to think about the things that a robot should consist
of...
2.2.1. The reference
field and the direction of a robot
Robots can communicate with their environment.
All instructions that do not refer to the robot, its data or its program,
affect the field facing the robot -- the `reference field'. This only makes
sense if each robot also has a direction which determines which field is
the reference field (in other words: which direction the robot is facing).
This is the same direction in which the robot can move.
2.2.2. Instruction
set
I thought it was useful to allow different
types of robots, so I introduced 3 different instruction sets. The instruction
set a robot uses indicates which instructions it can execute. Here are
the instruction sets:
Basic (0) - this contains all the
elements, like comparisons and jumps, necessary for a program to run, plus
arithmetic operations and movement routines. Almost all of the instructions
are contained here. However, robots using this instruction set cannot communicate
with other robots.
Instructions: ADD, BJUMP, COMP, DIE, JUMP,
MOVE, SET, SUB, TURN
Note: for movements, a robot needs the
additional mobility characteristic.
Advanced (1) - this contains, besides
all the instructions in the basic set, instructions for communication with
the reference field, or whatever robot happens to be there.
Instructions: ADD, BJUMP, COMP, DIE, JUMP,
MOVE, SCAN, SET, SUB, TRANS, TURN
Super (2) - this contains all instructions.
It consists of all the instructions in the advanced set plus the Create
instruction, which allows a robot to built more robots.
Instructions: ADD, BJUMP, COMP, CREATE,
DIE, JUMP, MOVE, SCAN, SET, SUB,TRANS, TURN
Robots with larger instruction sets take
longer to build, so it is not advisable to stick to only super robots.
The functions of the individual instructions are explained in section 2.3.6.
2.2.3. Properies
of a robot
A robot has various properties:
PLAYER - this refers to the player who
owns the robot. Different players and their robots are represented by different
colors.
ACTIVITY - robots can be deactivated, that
means they can get into a state in which they do not execute program code
and thus simply do nothing. An inactive robot does not act, however it
still continues existing and can also be reactivated again. Inactive robots
are crossed out with a yellow X.
MOBILITY - determines whether a robot can
move or not. Immobile robots can be built faster, but they have to stay
on the same field for all their life.
INSTRUCTION SET - see chapter
2.2.2. Different instruction sets are displayed by using different
colors for the robot frame.
VARIABLES - Each robot has 20 variables
of the type 16 bit signed integer that can be used freely by its program.
POSITION / DIRECTION - As said before,
the board is relative in every aspect so that it would not make sense (for
a robot) to speak of positions or directions. But of course, the interpreter
has to save values about this information, for example to determine the
reference field or the direction for a move.
CODE BANKS - the code banks contain a robot's
program code. See next chapter
2.2.4. Code banks
The program code of a robot is organized in
so-called banks. A code bank can contain any number of statements and each
robot can possess up to 50 banks. Many robots contain a lot of code which
they do not execute because it is not intended for them: many RoboCom programs
are based on co-operation between robots with different functions. The
first robot (a.k.a. the parent robot) must thus contain all the code which
its children are to execute. To allow the different programs to be logically
separated, memory banks were introduced.
The BJUMP statement causes program execution
to continue in another bank, and the TRANS instruction copies a memory
bank from the host robot to the robot in the reference field.
Robots with more banks require longer construction
times.
2.3. The RoboCom programming
language
As in assembly language, the program code
in each bank is a sequence of statements. Some statement need parameters:
these are separated by commas. A program thus looks like this:
InstrA
InstrB param1,param2
InstrA
InstrC param1
I assigned different clock cycle counts
(durations) to the various instructions: some instructions perform more
complex tasks than others, so this would make the game more realistic.
However, the clock frequency is the same for all robots (if 100 clock cycles
has passed for a certain robots, other robots would also have gone through
100 clock cycles).
2.3.1. Parameters
Parameters for a statement can be of 3 kinds:
constants, variables and remotes (remote constant/remote variable).
2.3.2. Constants
A constant can be an integer (e.g. 5, 1524,
-475), a label (see chapter 2.3.8) or one of the RoboCom-supplied constants
beginning with the $ character. Constants of this type are
| $Banks |
the number of code banks which the robot has. |
| $Mobile |
1 if the robot is mobile, otherwise 0. |
| $InstrSet |
the instruction set of the robot (0 = basic, 1 = advanced, 2 = super). |
| $Fields |
the size of the board (number of rows and columns). |
2.3.3. Variables
Each robot has 20 16-bit signed integer variables
at its disposal, named #1, #2, #3, ..., #20. Furthermore each robot has
a variable #Active which determines the activity of the robot: if #Active
>= 1 the robot is active, otherwise it is not. An active robot can deactivate
itself by setting #Active to 0, but an inactive robot cannot activate itself
since it does not execute program code.
2.3.4. Remotes
Remotes are the variables and constants of
the robot on the reference field. Remotes have names beginning with %.
Remotes allow a robot to obtain information about the robot on its reference
field. The available remotes are
| %Banks |
the number of memory banks the remote robot has (constant). |
| %Mobile |
1 if the remote robot is mobile, 0 otherwise (constant). |
| %InstrSet |
the remote robot's instruction set (0, 1, 2) |
| %Active |
the activity of the remote robot. |
These remotes correspond to the respective
local variables or constants of the remote robot. The `advanced' instruction
set is required to use remotes.. Accessing a remote consumes additional
clock cycles.
The remaining variables of the remote robot
(#1 to #20) cannot be accessed as remotes, so each robot has its own `private'
variable space. However, a robot can indirectly modify these variables
by transferring program code to the remote robot.
2.3.5. Basic structure
of a RoboCom program
A RoboCom program usually begins with a comment
(optional) which indicates that it is a RoboCom program (more on comments
in section 2.3.8). The title of the program is likewise optional, as is
the name of the author. These names can be longer than 8 characters and
may contain special characters. A program header can thus look like this:
; RoboCom program
Name Surprise!
Author Sammy Someone
; Here one can give a description of the
program.
The new Windows version also allows the
programmer to specify his home country
(e.g. Country Germany).
The next thing is the code banks. Each
bank begins with the identifier BANK followed by a name for the bank (optional),
after which follow the instructions in the bank. A bank ends at the end
of a file or the declaration of a new bank. The appearance of a complete
program is given in chapter 3.2. You do not need to name the banks; however,
doing so will aid in debugging.
2.3.6. Instructions
and their meanings
The RoboCom language contains 12 different
instructions, summarized in the following table.
In the column Instruction syntax,
a,
b
and c refer to the parameters of an instruction.
a means
that the parameter can be of any type, while #a means that the parameter
must be a variable.
`ISet' indicates the minimum instruction
set required to execute each statement.
Clocks indicates the number of clock
cycles required to execute each instruction.
| Instruction syntax |
ISet |
Clocks |
Function |
| ADD #a, b |
0 |
6 |
Adds b to #a. |
| BJUMP a, b |
0 |
5 |
Causes program execution to continue in program bank a at the
bth
instruction. |
| COMP a, b |
0 |
3 |
Compares a to b. If a <> b, execution
continues with the next instruction; otherwise, the next
instruction is skipped. This arrangement make conditional branches
unnecessary. |
| CREATE a, b, c |
2 |
|
Causes the robot to built another one on the reference field (if it
is free).
The new robot has instruction set a and b empty memory
banks.
c indicates whether the new robot is mobile (0 or 1)
The new robot is initially inactive.
Clock cycles:
50 in each case
+ 20 per bank
* 2 if mobile
+ 40 for instruction set 1
+ 80 for instruction set 2
|
| DIE |
0 |
1 |
Causes the robot to self-destruct and disappear from the board at the
next clock cycle. |
| JUMP a |
0 |
2 |
Performs an unconditional relative jump. |
| MOVE |
0 |
18 |
Causes the robot to move to the field before it (if it is free). The
robot must be mobile. |
| SCAN #a |
1 |
6 |
Scans the reference field and return the result of the scan in #a.
#a = 0 if the field is empty.
#a = 1 if an opponent's robot is there.
#a = 2 if a friendly robot is there. |
| SET #a, b |
0 |
5 |
Sets #a to b. |
| SUB #a, b |
0 |
6 |
Subtracts b from #a. |
| TRANS a, b |
1 |
|
The robot transfers its ath memory bank to the bth memory
bank of the robot on the reference field.
Clock cycles:
5
+ 3 per instruction in bank |
| TURN a |
0 |
5 |
The robot turns 90 degrees left (a = 0) or right (a <>
0). |
Note: All durations can be changed in the
options.
2.3.7. Comments
Comments can be added to a program to make
it more readable. They are ignored by the interpreter. Comments begin with
the ; character and can either be placed at the beginning of a line or
after a statement. E.g.:
; This is a comment.
Add #4, 1 ; The variable #4 is incremented
by 1.
2.3.8. Labels
The RoboCom language also supports labels.
Labels are not really necessary, but they can make programming easier.
Label designators begin with @ and each label can only be defined once.
To define a label, the label designator is inserted within the block of
statements in a bank. The label designator can be used elsewhere like a
constant: if the definition and reference are in the same bank, the label
stands for the distance between the two, otherwise for the number of statements
in the bank containing the label.
Have a look at a program implemented in
2 ways:
; RoboCom program
Name Old
Bank Main-program
Add #1, 1
Turn 1
Jump -2
|
; RoboCom program
Name Now-with-label
Bank Main-program
@Loop
Add #1, 1
Turn 1
Jump @Loop
|
The programs behave identically: the robot
increments #1, turns 90 degrees to the right, and starts all over again.
In the program Old the jump is implemented using Jump -2,
which jumps 2 statements forward, i.e. to the Add instruction; in
the program Now-with-label the same instruction is referred to via
the @Loop label, in Jump @Loop. Here '@Loop' returns the
relative distance between the label declaration and its reference, i.e.
-2. The use of labels is not limited to jumps: e.g. the instruction Comp
#3, @Weiter compares #3 to the distance between `@Weiter' and this
instruction.
2.4. Auto-reboot
If a robot finds that there are no more statements
to execute, the program execution automatically continues with the first
instruction of the first bank. This allows one to save some jumps in loops.
If the first bank is empty after the auto-reboot, the robot dies.
2.5. Exceptions and
errors
Errors can occur from time to time, either
because a robot is executing a wrong program transferred to it by another
robot, or because the programmer made a mistake. There are several categories
of such situations:
2.5.1. Tolerable exceptions
Tolerable exceptions are unexpected situations
which are handled according to certain rules. For example, if a robot tries
to access remote variables when the reference field is empty, all values
read will be 0 and all values written will be lost. The amount of time
taken in this case is the same as with the proper execution of the instruction.
There are other such exceptions, but they will not be listed here.
2.5.2. Run-time errors
(fatal exceptions)
Run-time errors are exceptions that are not
tolerated. For example, an immobile robot that tries to execute the Move
instruction will die. If the announcement of errors is switched on, an
error message which describes the type of error in more detail will be
generated.
2.5.3. Data Hunger
This error occurs if a robot, upon being activated
or after an auto-reboot, finds the first memory bank empty.
2.5.4. Elimination
Sometimes a robot is programmed in such a
way that the final value of a loop is overshot. E.g. a variable is increased
and then compared to 10 repeatedly, but the final condition is never true
because the value is already greater than 10. The robot is thus stuck in
an infinite loop. To eliminate such robots, an elimination trigger
was introduced: once a variable overshoots or falls below a certain adjustable
value after an Add or Sub, the elimination trigger is released
and the robot is removed from the board.
3. Let's get started!
3.1. Invoking RoboCom
3.1.1. RoboCom version
1.x
The game is started by typing ROBOCOM followed
by the file names of the game programs (max. 5). E.g.:
C:\>robocom mine.rob wall3.rob pest.rob
If the DOS version is started under Win95,
a mouse driver must be loaded. The RoboCom interpreter has a graphical,
mouse-driven user interface. On the left side of the screen is the board,
where the initial robots are placed and oriented randomly. The bar on the
right side contains the controls: different options can be modified here
and the simulation can be started, stopped and so on. The simulation is
started with the Start button. By the way: all the routines for buttons,
scrollbars, list boxes and dialog elements were completely written by myself.
3.1.2. The shell system
In February 1997 the shell system RShell was
developed. It is an additional application which displays all RoboCom programs
and opens an editor on mouse click. The RoboCom interpreter can be started
from the Shell: the parameters necessary are automatically transferred
by RShell. RShell occupies ~ 85Kb memory. With very memory-intensive simulations
it is better to do without the shell system.
3.1.3. Windows version
RoboCom 2.x is a Windows 95/NT application,
which is easily started by clicking the appropriate icon. Command line
parameters are not necessary: programs can be selected from a graphic dialog
box using the mouse.
Since RoboCom 2.2 it is possible to save
RoboCom programs in an encrypted binary format (RBI). If an RBI file is
loaded into the interpreter, the debugger does not show information about
the program code. Thus, a programmer can pass his programs to other authors
for them to simulate against theirs, but he is not required anymore to
give away his know-how.
3.2. A simple program
Here is a simple program which already does
something useful:
; RoboCom program
Name Mine
Bank Mine
@Loop
Turn 1
Set %Active, 0
Scan #1
Comp #1, 1
Jump @Loop
Trans 2, 1
Set %Active, 1
Bank Poison
Die
|
; First bank, containing the program
; Label at the beginning of the loop
; Turn to right
; Deactivate potential opponent
; Scan reference field
; Actually an opponent?
; No, keep turning
; Yes, transfer bank 2!
; Re-activate and let it run
; Auto-reboot, keep turning
; Whichever robot executes this bank
; ...commits suicide!
|
[program description not translated yet]
3.3. The initial robot
and the production of further robots
The first robot (initial robot) contains all
banks defined in the source, always has the super instruction set
(2) and is immobile in the standard configuration. If a player wants to
have moving robots, then he has to program the initial robot to build further
robots. This is done using the Create instruction. Since a faster
program is usually more successful, a player should consider which features
the newly-built robot really needs - the larger the instruction set and
number of banks, the longer the robot takes to build, and making the robot
mobile will also slow down its construction (see section 2.3.6). A newly-built
robot is always inactive: if it was active, it would die of Data hunger
because it contained no program. The parent robot must program the new
robot using the Trans instruction.
3.4. Program variety
or single pattern?
In the early phase of the development of RoboCom
I feared that the programming of the robots' strategics would soon become
boring, because there would soon be a single successful strategy and all
subsequent programs would only be variations on the same theme. Fortunately
this was not the case: time and time again there were new ideas for RoboCom
programs, each successful in its own way. One cannot speak of the 'ultimate
strategy', because it does not exist. All programs have their strengths
and weaknesses.
[Descriptions of the sample programs not
translated yet]
3.5. Errors which are
actually not errors
For a while I thought that my RoboCom interpreter
was full of bugs. Every now and then I ran into situations which seemed
impossible. For example, once a robot gave the error message instruction
set 2 required although my program used no instructions from this set.
In another case the robot went into an infinite loop. Normally the program
should set a variable to 10 and decrement it repeatedly until the variable
reaches 0. Meanwhile the variable had already reached -400! At first I
attributed this to bugs in the interpreter, until I discovered that it
is actually a logical consequence of a chain of events. Examining the problem,
I had only looked at ONE robot, however one must remember that there are
many robots on the playing field and they do many different things, influencing
one another so that those situations become possible. A simple example
to make things clearer:
A robot wishes to produce a clone of itself
on its reference field, and it builds a robot with instruction set 2 using
'Create'. Next it copies its own program to the robot. However, as program
execution comes to the `Create' statement, another robot with instruction
set 1 moves onto the reference field, causing the Create instruction
to fail (since the field is already occupied). Now, the program that is
meant for the clone is thus transferred to this other robot. After the
2nd robot is activated, an error occurs since the robot only has instruction
set 1. Sometimes similar `errors' can lead to very confusing situations,
that are fascinating again and again - because they arise from logical
consesquences. One can often use the realizations from a closer investigation
of the situation in his own programs by consciously controlling the observed
situation. The program Persuaders 3 is an example of a program written
in this way.
3.6. Time for an inspection
- the RoboCom debugger
It was explained in section 3.6 how complex
things can be during a RoboCom session. Therefore it is useful for a RoboCom
programmer to know what the robots are doing, to find out whether his program
behaves as desired. Because of this, I implemented the RoboCom debugger
within the interpreter. The simulation can be run slowly, step-by-step
or continuously, and can be interrupted anytime. Clicking on a robot during
an interruption or while the simulation runs, opens the debugger window.
This displays all information about the
robot: mobility, activity, the instruction set, the number of banks and
instructions contained therein, the contents of all variables and constants,
the entire program contained in the robot, and the next instruction that
will be executed. The debugger also allows the user to modify the contents
of variables. With the RoboCom debugger, one can find errors very quickly.
The debugger in RoboCom 2.x even allows several robots to be debugged simultaneously
even as the simulation continues! In Version 2.1 and higher it is possible
to set breakpoints in the debugger using F7 .
4. Literature and
links
(1) the new RoboCom homepage
http://www.cyty.com/robocom
(2) Open Windows in Europe (Internet project
in Stockholm)
http://www.comedia.se/fonster98
(3) Durham, Mark et al.: Draft of Proposed
1994 CoreWar Standard, Version 3.2
ftp://ftp.csua.berkeley.edu/pub/corewar/documents/icws94.202.Z
(University of California)
(4) Strack, Stefan: CoreWar Frequently
Asked Questions
http://www.stormking.com/~koth/corewar-faq.html
(The International CoreWar Society)